 RMON
- How to set up your Time zone
- How to create a Telegram bot and use it with RMON
- How to create a Slack APP and use it with RMON
- How to create PagerDuty Integration key and use it with RMON
- Notifications and alerting
- Status pages
- Security checklist
- Company sign-in with OIDC
- Get started with the RMON API
- Backup and recovery
- How to use groups and roles
- How to change user settings
Servers
RMON Settings
Open Admin area → Settings and expand a section to change its values. This reference explains the fields used for day-to-day administration. See installation for host setup and user settings for personal preferences.
Saving and scope
- Check Current group in your user settings before editing group-owned values.
- For a text or number field, enter the value and leave the field to save it. Selectors and checkboxes save when changed. There is no page-wide Save button.
- Wait for the row to highlight. If an error appears, correct it and try again.
- Reload the page and confirm that the value remains before applying related agent changes.
Agent connections belongs to each agent owner's group. Shared agents retain that owner's settings. Installation-wide values, including the result receiver address and port, RMON name, outbound proxy and VictoriaMetrics enable switch, are managed centrally in the Default group. Available sections depend on your role; ask the installation administrator to change central settings.
Save related certificate paths first and reconfigure agents only after all required values are ready. A saved value confirms the setting was recorded; it does not confirm that a remote connection has succeeded.
Agent connections
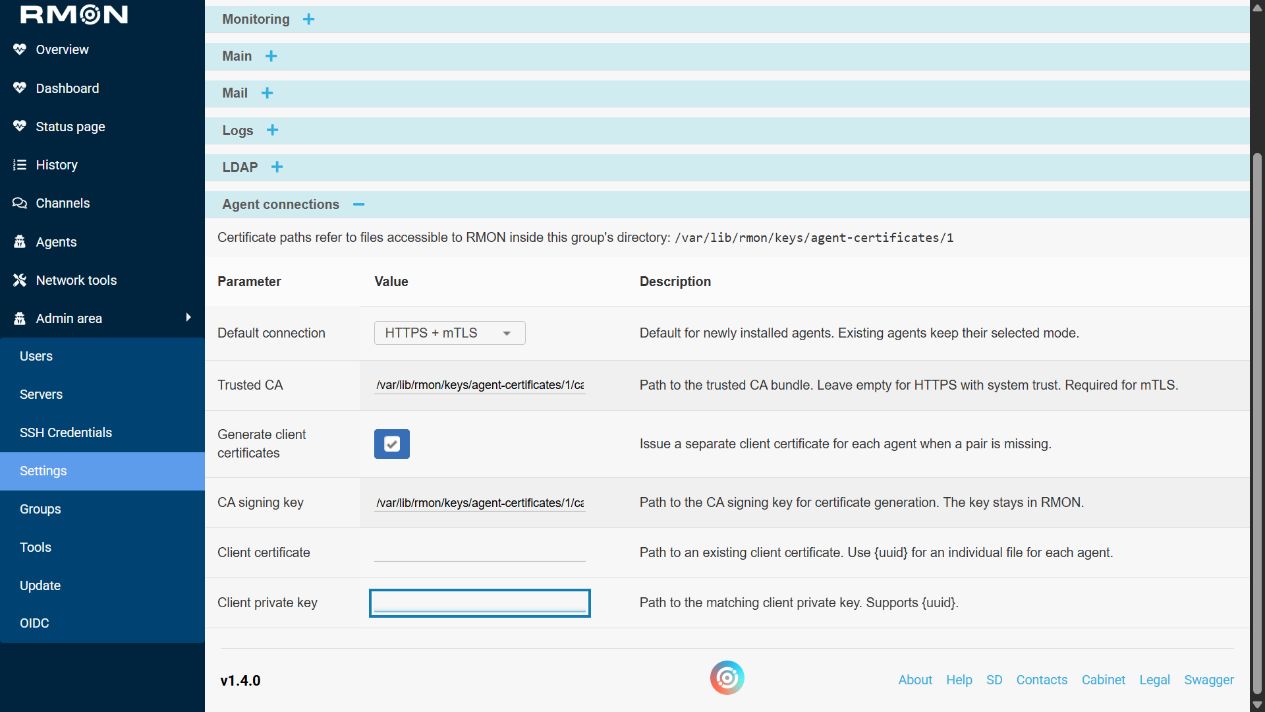
Scroll horizontally to view the full table.
| Field | What to enter | When it is needed |
|---|---|---|
| Default connection | HTTP, HTTPS or HTTPS + mTLS | Preselects the mode for a new agent. Existing agents retain their selected mode. |
| Trusted CA | Absolute path to the trusted CA certificate or bundle | For a private CA with HTTPS; always required for mTLS. Leave empty for HTTPS using system trust. |
| Generate client certificates | Enabled or disabled | When enabled, RMON can issue a missing mTLS client pair using the supplied signing CA. |
| CA signing key | Absolute path to the CA's private signing key | Required to generate a missing client pair. It stays on the RMON side. |
| Client certificate | Absolute path to an existing client certificate | Use together with Client private key when supplying your own pair. |
| Client private key | Absolute path to the matching private key | Use together with Client certificate. Both paths can use {uuid} for separate agent files. |
Copy the actual files into the group directory displayed on this page before starting installation. For example, if the page shows /var/lib/rmon/keys/agent-certificates/1, the Trusted CA value can be /var/lib/rmon/keys/agent-certificates/1/ca.crt. Use the directory shown for your own group, which may have a different number or base path.
In Docker, paths refer to files visible inside RMON's mounted storage. Give the RMON service account read access to certificates and keys and write access to the group directory when generating certificates. Protect private keys with mode 0600. Path fields contain filenames, not certificate contents.
Follow the HTTPS example, mTLS generation example or existing certificate example. For existing agents, apply the changes with Reconfigure and verify fresh check results.
RMON monitoring settings
Scroll horizontally to view the full table.
| Parameter | Example | Effect and follow-up |
|---|---|---|
master_ip | results.example.com | The result receiver address reachable from agents. Enter a hostname or IP without a scheme, port or path; separate multiple addresses with commas. |
master_port | 5100 | The result receiver's port, used for the listed addresses. Reconfigure affected agents after changing receiver settings. |
keep_history_range | 14 days | Monitoring history retention. Back up history before reducing retention; increasing it cannot restore records already removed. |
ssl_expire_warning_alert | 14 days | Warning threshold for an approaching monitored HTTPS certificate expiry. |
ssl_expire_critical_alert | 7 days | Critical expiry threshold. Use a smaller remaining-days threshold than the warning value. |
use_victoria_metrics | Enabled after endpoint setup | Use the configured metrics service for response measurements. See VictoriaMetrics setup and verification. |
Configure result receivers for the selected protocol before applying agent changes. The RMON Server guide covers that step. The agent's management port is set on the agent; it is separate from master_port.
Main
Scroll horizontally to view the full table.
| Parameter | How to use it |
|---|---|
rmon_name | A recognizable installation name, such as Production monitoring, used in notifications. |
license | A license key, if one was supplied for your existing installation. RMON is currently free; see access and licensing before changing this setting. |
time_zone | Select a named zone, such as Europe/London. Reload history and check event times afterward. |
proxy | The required outbound proxy, for example http://proxy.example.com:3128. Leave empty when no proxy is required, then test the affected notification destinations. |
session_ttl, token_ttl | Session and token lifetimes in days. Choose values under your organization's access policy. |
tmp_config_path, cert_path | Installation paths. Keep the supplied values unless your administrator has prepared replacement paths and permissions. Agent result certificates use the separate Agent connections fields. |
The installation administrator configures the SMTP connection in the Default group. Obtain the following values from the mail administrator, then create recipients under Channels → Email.
Scroll horizontally to view the full table.
| Parameter | Example or required value |
|---|---|
mail_enabled | Enable email features. |
mail_smtp_host | smtp.example.com, without a URL scheme. |
mail_smtp_port | The SMTP submission port supplied by your provider, commonly 587 for STARTTLS. |
mail_ssl | Enable the SMTP TLS upgrade (STARTTLS). Use an endpoint supporting this connection mode. |
mail_smtp_user, mail_smtp_password | The SMTP account and its password, entered in their dedicated fields. |
mail_from | An allowed sender address such as monitoring@example.com. |
mail_send_hello_message | Enable a welcome email when creating users if your onboarding process needs it. |
Click Test on the email destination and verify actual receipt. If the message is absent, check mail logs, authentication, sender policy and spam filtering. Complete the email walkthrough before relying on alerts.
Changes to browser notifications
RMON 1.4 no longer provides browser notifications or the RabbitMQ settings used by them. Configure notification channels and select the required destinations on each check. RabbitMQ monitoring checks remain available.
Administrative history
action_keep_history_range sets administrative action-history retention in days, for example 30. Monitoring measurements use their own retention setting. Export or back up records that must be retained before shortening either period.
Logs
log_time_storage controls activity-log retention in days. Keep apache_log_path consistent with the installed web service. A Docker deployment may use service logs instead of native Apache log files. Follow the log guide for the exact commands to locate a failure.
LDAP sign-in
Ask your directory administrator for the server and port, bind account and password, base DN, domain, user class, login attribute and email attribute. Enter them in ldap_server, ldap_port, ldap_user, ldap_password, ldap_base, ldap_domain, ldap_class_search, ldap_user_attribute and ldap_search_field.
For example, a base DN may be dc=example,dc=com; use the values matching your directory rather than assuming every directory uses the same attributes. Select ldap_type for LDAPS and use the corresponding server port and trusted certificate. Enable ldap_enable after completing the fields.
Keep your working local administrator session open. In a separate browser session, test a directory user's sign-in and verify the intended group and role. If it fails, review the directory account, search attributes, certificate trust and connection error before enabling access for the team.
Company sign-in with OIDC
Open Admin area → OIDC to configure providers and group/role mappings. Register the exact callback address displayed by RMON in the provider. Test sign-in with an ordinary company account while retaining local administrator access. Follow the company sign-in walkthrough for provider settings, claims, access mapping and troubleshooting.
Installation configuration and backups
Database selection, the public URL and application keys are configured for the installation. Follow the installation guide when changing them. Keep the existing database and original application keys together using Backup and recovery. Review network requirements before changing service addresses.