 RMON
RMON
- How to set up your Time zone
- How to create a Telegram bot and use it with RMON
- How to create a Slack APP and use it with RMON
- How to create PagerDuty Integration key and use it with RMON
- Notifications and alerting
- Status pages
- Security checklist
- Company sign-in with OIDC
- Get started with the RMON API
- Backup and recovery
- How to use groups and roles
- How to change user settings
Servers
Website and API monitoring
What an HTTP check can verify
An HTTP check sends a request to a website or API and compares the response with the conditions you set. It can confirm much more than basic availability:
- The URL is reachable within the configured timeout.
- The response has an accepted HTTP status code and, optionally, the expected HTTP version.
- The response body contains a keyword or a JSON value.
- Required response headers are present and forbidden headers are absent.
- An HTTPS certificate is valid and is not approaching expiration.
- The total response time remains below your threshold.
Use a public page check for customer-facing availability and a dedicated health endpoint when you need to validate application state.
Create a check
- Open Dashboard → Add check.
- On Check, select HTTP, enter a name and complete URL, then select locations under Run checks from.
- On Settings, set interval, timeout, retries and the request and response rules below.
- On Notifications, select channels, priority, runbook, check group, description and enabled state.
- Click Create check and review a fresh result from each location.
The same logical check can run from several selected locations. This makes it easier to see whether a failure affects one network path or all users.
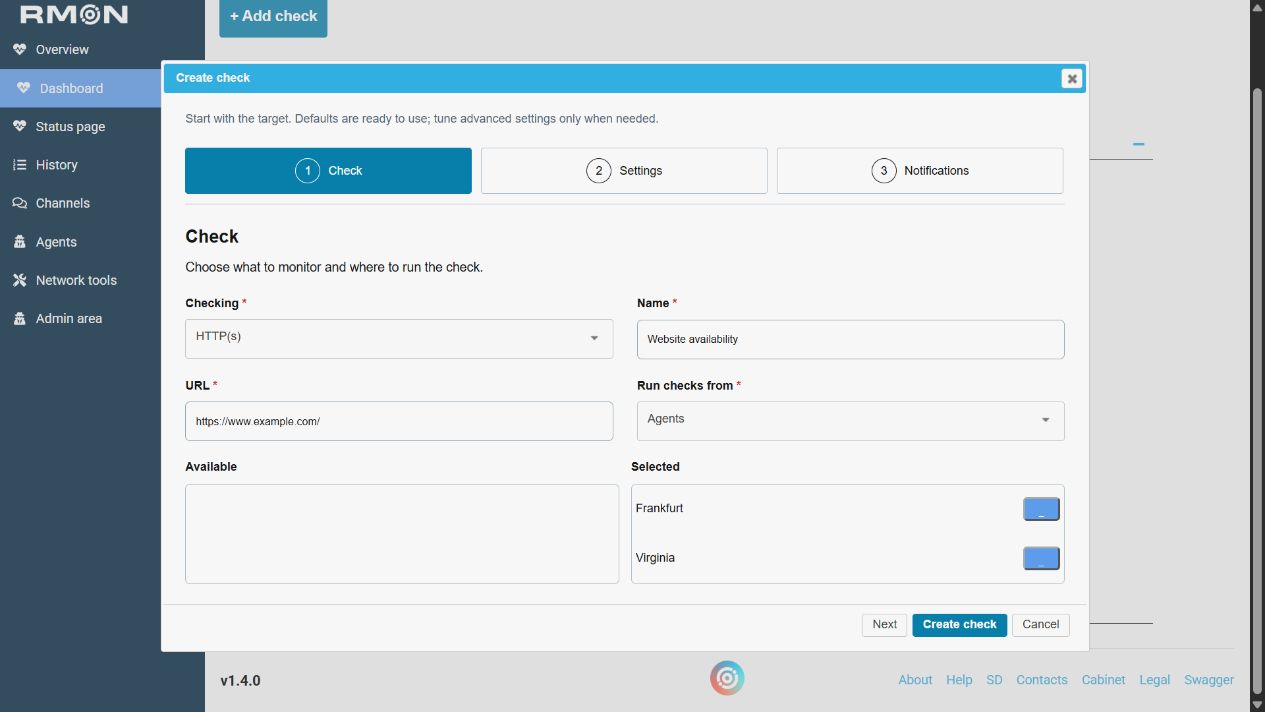
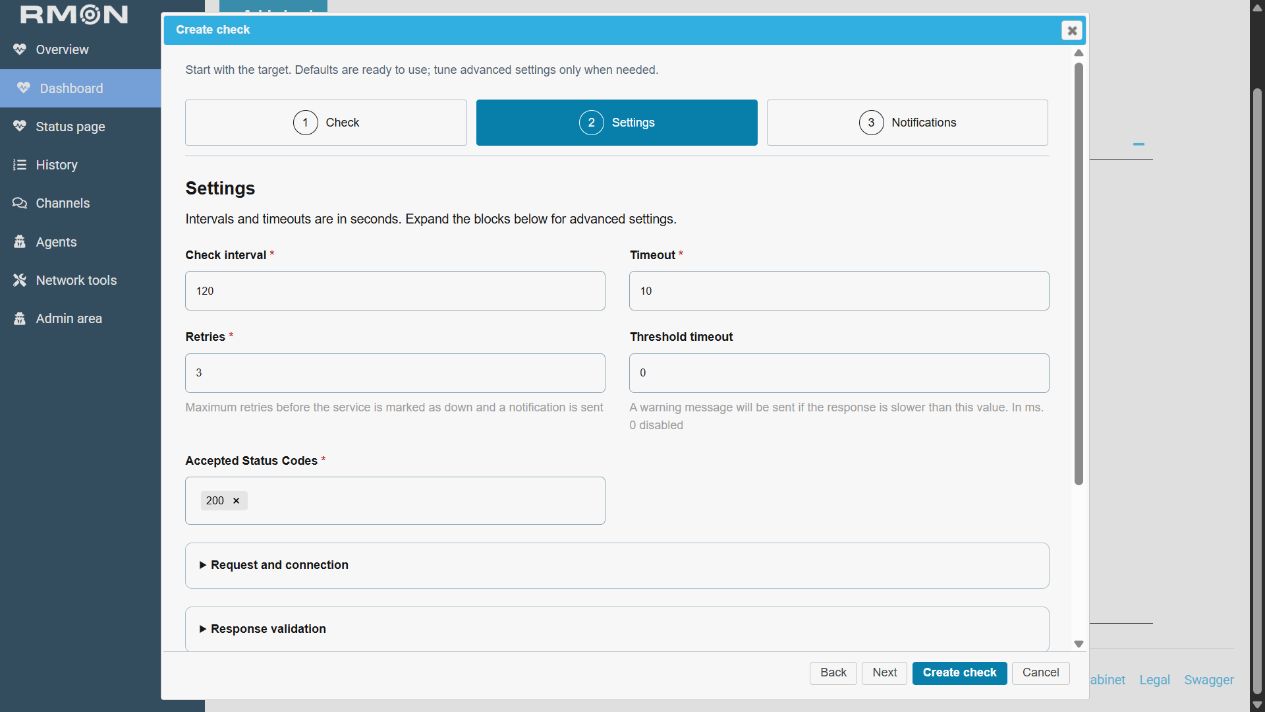
General check settings
- Name: a recognizable name shown on the dashboard, in history, notifications, and status pages.
- Run checks from: all regions, a country, a region, or one or more agents from which the request will be sent.
- Check interval: how often the check runs, in seconds.
- Timeout: the maximum time RMON waits for an individual request, in seconds.
- Retries: the maximum number of retry attempts before the service is marked down and an alert is sent.
- Enable: starts the check after it is saved. Clear this option to save the configuration without running it.
- Expiration date: automatically disables a temporary check at the specified date and time. Enter the value in UTC.
- Threshold timeout: sends a warning when the response is slower than this value, in milliseconds. Use 0 to disable the threshold.
- Priority: Info, Warning, Error, or Critical. The selected level is used for incidents from this check.
- Runbook: an optional link to instructions for the team responding to an incident.
- Group: a label used to organize related checks in RMON and on status pages.
- Description: additional user-facing context about the service or purpose of the check.
Notification fields let you select one saved destination for each available provider. Leave a provider set to Disabled when it should not receive incidents from this check. See Notifications and alerting for channel setup and testing.
Request settings
- URL: the exact page or endpoint to request. Include the scheme and any required path or port.
- Resolve to IP: sends the request to a particular IPv4 or IPv6 address while using the hostname from the URL. Leave it empty for normal DNS resolution.
- HTTP method: GET, POST, PUT, HEAD, PATCH, DELETE, or OPTIONS. Use the method expected by the endpoint.
- Body request: an optional JSON request body, most commonly used with POST, PUT, or PATCH.
- Headers request: optional request headers entered as a JSON object.
- Check HTTP version: leave as None to accept the negotiated version, or require HTTP 1.1, HTTP 2, or HTTP 3.
- Accept cookies: allows cookies returned during the request flow. Disable it when the endpoint must be checked without cookies.
Example request headers:
- {
- "Accept": "application/json",
- "X-Monitoring-Client": "rmon"
- }

Response validation
Accepted status codes
Add one or more values that RMON should treat as successful. You can use an exact code, a range, or an entire status class.
- 200 — accept only HTTP 200.
- 200-204 — accept every code from 200 through 204.
- 2xx or 2** — accept any 2xx success code.
- 200 and 301 — add both values when either response is expected.
Response body
- None: do not inspect the body.
- Keyword: require the response body to contain the entered text.
- JSON Path: require a path to exist in a JSON response and optionally compare its value.
For a response such as {"status": "ok"}, enter $.status as the path and "ok" as the expected value. Leave the value empty when the path only needs to exist. Expected values can be strings, numbers, booleans, or null; enter them in the same form as they appear in the JSON response.
Response headers
Choose Check in Headers response to validate required and forbidden headers. Header names are matched without regard to letter case.
Required headers are entered as JSON:
- {
- "Content-Type": "application/json",
- "X-Frame-Options": "DENY"
- }
Use an empty value when only the presence of a required header matters, for example {"X-Request-ID": ""}. When a value is provided, the response header must contain that text; comparison ignores letter case.
Enter forbidden header names in the forbidden field, for example:
- "Server", "X-Powered-By"
RMON also checks the HTTPS certificate and reports a warning when it is approaching expiration. The maximum data size handled during an HTTP check is 10 MB.
HTTPS policy
Use Settings → Request and connection → HTTPS policy to require a particular protocol at the end of an HTTP check. The policy applies to the final URL after the allowed redirects. It runs with each scheduled check and when you run the check manually. Use Agent 1.20 or later; update older agents before enabling a required policy.
Scroll horizontally to view the full table.
| Mode | Requirement |
|---|---|
| Default | Keep the existing behavior. Both HTTP and HTTPS destinations are allowed, but a request starting with HTTPS and ending with HTTP fails. |
| Require HTTPS | The final URL must use HTTPS. An HTTP address that redirects to HTTPS passes this requirement. |
| Require HTTP | The final URL must use HTTP. A redirect from HTTP to HTTPS fails this requirement. The existing HTTPS-to-HTTP failure rule still applies. |
The other conditions still apply: a matching protocol alone does not make a check successful. An unexpected status code, invalid certificate or failed response condition can also cause a failure. Ignore TLS/SSL error controls certificate verification and does not disable the HTTPS policy. The policy checks the final URL; it does not certify every intermediate redirect or enforce a particular TLS version or cipher.
- For a redirect-to-HTTPS check, enter an address such as
http://www.example.com/health. - Allow enough redirects to reach the intended endpoint and choose Require HTTPS.
- Set the expected response code, save the check and run it. A final HTTPS address satisfies the policy; a final HTTP address produces an SSL policy error.
- Review a fresh result from each selected location. The selected policy is retained when editing or copying the check.
With redirects set to 0, RMON checks the requested address without following a Location header. An HTTP response pointing to HTTPS therefore does not satisfy Require HTTPS. If you are checking the redirect response itself, choose Default and accept its expected 3xx response code.
A policy violation follows the check's configured retries and notification settings. The reason appears in the result history and failure notification. When the endpoint satisfies the policy and the other conditions again, the check recovers through the usual notification workflow. Existing checks remain on Default until you change them.
Redirects, proxy, and authentication
- Maximum redirects: how many redirects RMON may follow. The default is 10; use 0 when redirects must be treated as the final response.
- Proxy: select HTTP, HTTPS, SOCKS4, SOCKS4A, SOCKS5, or SOCKS5H, then enter the proxy host and port. Add a username and password only when the proxy requires authentication.
- Basic authentication: enter the username and password supplied for the monitored endpoint.
- mTLS: enter the client key and certificate and, when required, the CA certificate for the monitored HTTPS endpoint. These credentials are separate from the group certificates used to deliver agent results.
- Ignore TLS/SSL errors: bypasses certificate validation. Keep this disabled for normal monitoring.
Examples
Public website
- URL: https://www.example.com/
- Method: GET
- Accepted status codes: 200
- Body response: Keyword → Welcome
- Maximum redirects: 10
- Ignore TLS/SSL errors: disabled
JSON health endpoint
- URL: https://api.example.com/health
- Method: GET
- Headers request: {"Accept": "application/json"}
- Accepted status codes: 2xx
- Body response: JSON Path → $.status
- Expected value: "ok"
Test a new server before DNS changes
- URL: https://www.example.com/health
- Resolve to IP: the new server's IP address
- Accepted status codes: 200
- Ignore TLS/SSL errors: disabled
Results and troubleshooting
Open a check from the dashboard to review its latest state, uptime, certificate expiration, history, and request timings. A failure message identifies the condition that did not match, such as a timeout, unexpected status code, missing keyword, header mismatch, JSON value, HTTP version, or certificate problem.
Request timings
- Resp time: total time for the HTTP request.
- Name lookup: time spent resolving the hostname.
- Connect: time spent establishing the network connection.
- App connect: time spent establishing the secure connection for HTTPS.
- Pre transfer: time until the connection is ready to transfer data.
- Redirect: time spent following redirects.
- Start transfer: time until the first response data is received.
- Download: time until the response download is complete.
To inspect the network path from a selected location, click the check name and then select the Show route icon. Compare routes from different locations when only one agent or region reports a failure.
Troubleshooting
- Only one location fails: compare the route and connectivity from that location with the others.
- Unexpected status code: open the URL from the same network if possible and review redirects, authentication, and accepted codes.
- Keyword or JSON check fails: inspect the current response and confirm that the path, value, spelling, and letter case match.
- Header check fails: compare the actual response headers with the required and forbidden lists.
- Timeout or slow warning: compare the request timeout with Threshold timeout and review the timing chart.
- TLS/SSL error: correct the certificate, hostname, chain, or validity period instead of permanently ignoring the error.
- The service is down but no alert arrives: check retries and confirm that a saved notification channel is selected for the check.
For alert configuration, see Notifications and alerting. For handling credentials and public data safely, see the Security checklist.